Showing posts with label Guides. Show all posts

Tuesday, December 25, 2007

Making a Pandora Battery and Magic Memory Stick (DCv3)

Updated since I have repeated this twice already and it's quite troublesome to type it all out.

You need an original Sony PSP/PSP Slim Battery and a original Memory Stick Pro Duo (256MB - 1GB will be enough)


It has lots of pictures so it should be easy to follow =).

Follow it until STEP 16

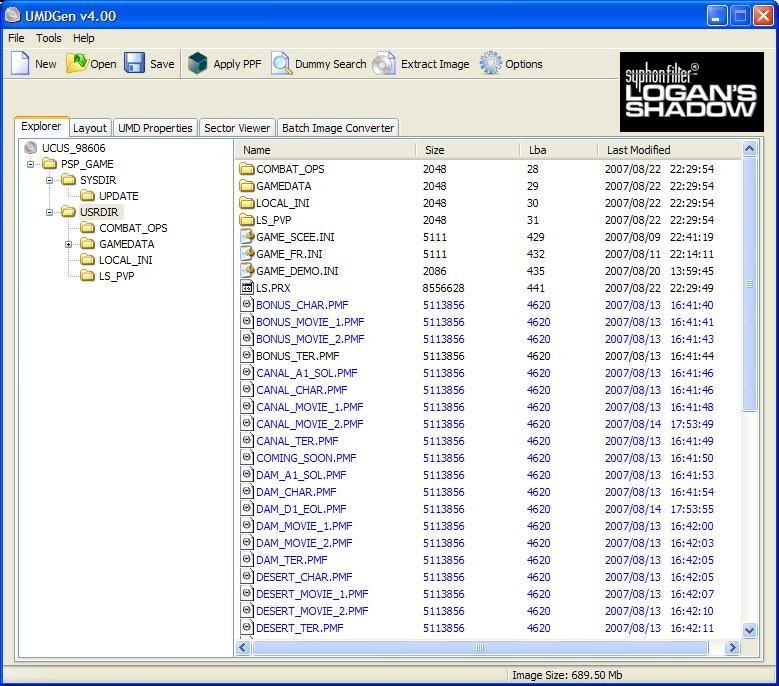
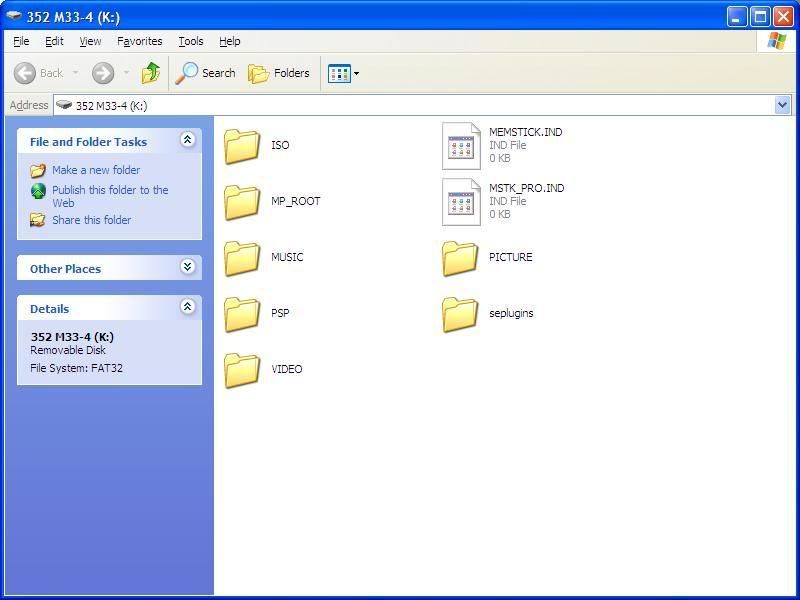
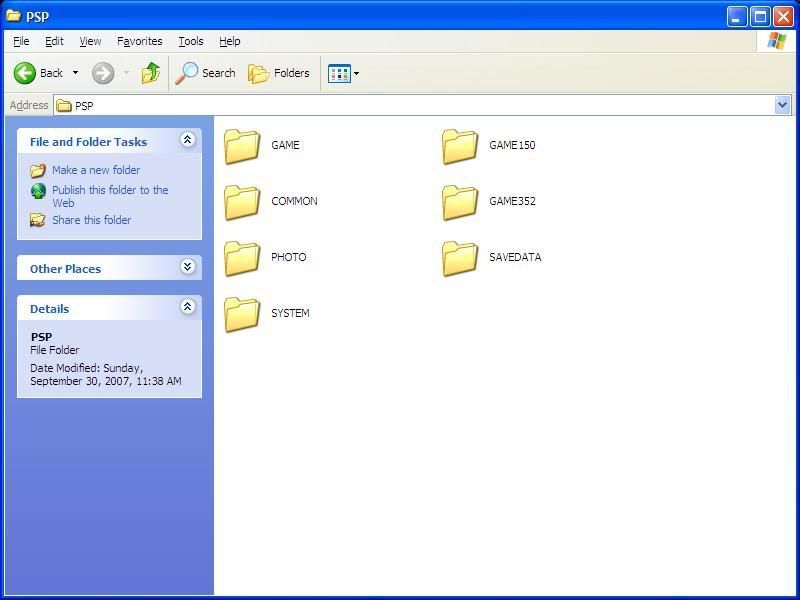
Now you should have the same folders/files like in the picture: kd, PSP, registry (folders) and msipl.bin, UPDATE.PBP (files)

Delete the kd folder.

Download the universal unbricker (Despertar del Cemeterio v3): http://w14.easy-share.com/13022661.html

This will work for both old PSPs and PSP Slims, and it will install 3.71 M33-2 straight.

Inside the RAR there is a readme file, follow the instructions there, starting from the line "- Copy despertar_cementerio to PSP/GAME/" and ending at "- Now you can delete 340 and 150 PBP's, as they won't be used more; but 371.PBP will be used for unbricker, so don't delete it."

Just to check, you should now have the following folders/files on your memory stick:
kd, PSP, registry (folders) and msipl.bin, 371.PBP (files)

Any other file besides those can now be deleted.

Lastly, use this file to make the Pandora battery: http://w15.easy-share.com/13022801.html

Copy the ospbt_04 folder to /PSP/GAME, and run it from your PSP.

If you want, backup the EEPROM. This will let you convert your battery back to a normal one in the future.

Then select the service mode option to convert your battery into a Pandora battery. You can test that it's working by removing the battery and putting it back into your PSP. If the green light comes on automatically, the battery was converted correctly and it's now a Pandora battery.

To use it, put in the memory stick first, then put in the battery. For some reason there is no display on your screen, but to install 3.71 M33-2 just press X when the lights on the left of your PSP stop blinking. Once you press X the lights will start blinking again, wait until you are sure they have stopped before pressing X again, and the PSP should then shutdown. Only then is the update complete.

If the download links stop working, email me and I will fix it asap. Alternatively you can also try to Google for the file yourself.

Merry Christmas =)

Tuesday, November 13, 2007

Ripping PMF Files

Always thought those in-game cutscenes were cool, but you couldn't view them anywhere else except during the game?

If you have custom firmware on your PSP, get PMF Player. You need the 1.50 kernel to run this homebrew, so it won't work on the PSP Slim. Also, you will need to rip the PMF out of the ISO image and place it on your memory stick.

Want to play PMFs on your PC? For that, we have the PMF codec, coded by JoeyT2005 and mupet0000. Although they said that sound was possible with the correct codec installed, I've not been able to find a correct codec for this purpose. So, your PMFs will play back without any sound.

Finally, we have the most interesting part: Ripping a PMF file to its video and audio components, and re-encoding them into the AVI container. It isn't a must to make it AVI, but that's the one I tried. You'll need a bunch of software for this, some basic DOS knowledge, as well as a PSP with custom firmware to run AT3Decode.

What you'll need
K-Lite Codec Pack FULL
MPlayer
VirtualDUB
AT3Decode

Note: The steps listed here assume that you have extracted MPlayer to C:\mplayer. This is to make it easier for those who have not used DOS before.

First of all, you'll need to extract your PMF file out of your ISO image. Use UMDGEN to open up the ISO image, right-click on the PMF file you want to extract, and select "Extract to..."


Extract the files for MPlayer and VirtualDUB to their own folders. There is no setup program for those two applications. For simplicity, I am assuming that you have extracted MPlayer to "C:\mplayer". VirtualDUB can be extracted wherever you want to.

Copy your PMF file over to the mplayer folder. Let's rename it "convert.pmf", to make it easier to refer to. This is what your mplayer folder should look like now:


Now we got to type in some DOS commands. No worries if you haven't used DOS before, just follow the steps and you'll be alright.

Click Start > Run and type in "cmd". The command prompt should pop up. Now we'll navigate to the directory with mplayer in it. Type in "cd \mplayer" to go to the directory straight away.


We'll settle the video component first. Firstly, we have to rip out the video stream. Type in "mplayer convert.pmf -dumpvideo". MPlayer will rip the video stream into a file called "stream.dump".


Video stream dumped


The video stream is unusable in its current RAW format, so we have to encode it to AVI. To do that, type in "mencoder stream.dump -o movie.avi -ovc lavc -lavcopts vcodec=mpeg4:vbitrate=1500 -noskip". This step could take up to 30 minutes or more, depending on how fast your computer is, the file size, and the bitrate.

If you have problems, make sure you have installed the K-Lite Codec Pack FULL. This contains codecs that are needed for encoding video/audio.

You can change the bitrate of the encoded AVI by changing the number "1500" to any other number of your choice. My tests indicate that the resolution is around 1000-2000 kbps, so stick to that range. Putting a higher bitrate than what was encoded into the PMF does not improve the video quality and needlessly increases the file size. If somebody knows the exact bitrate of videos encoded to PMF, or a range, please do tell me =).

Also, I have no idea what "-noskip" does. I saw no difference between videos with and without the noskip flag, but I left it there anyway.


The video encoded to AVI


When it's done, you'll have a AVI file in your mplayer folder. We're now done with the video part, and it's time to move on to the audio.


Current state of the mplayer folder


Back in the command prompt, type in "mplayer -dumpaudio -dumpfile convert.at3 convert.pmf". This will rip the audio from the PMF file into a AT3 file.


AT3 ripped from the PMF


Now we will need to run AT3Decode on the PSP in order to decode the AT3 file into a WAV file for combining with the video. Extract the "at3" and "PSP" folder to the root of your memory stick. When it asks whether you want to overwrite, click "Yes to all". Copy "convert.at3" from the mplayer folder to the at3 folder on your memory stick.

On your PSP, run the AT3Decode homebrew. I won't put up a screenshot cos there is no input required. The program will decode whatever AT3 file it finds inside the at3 folder.

Once done, you'll have a "CONVERT.AT3.wav" file on your memory stick. Copy that to the mplayer folder so we can continue with the final step in the process, combining the audio and video.


What your mplayer folder should look like now


For the combining, we'll be using VirtualDUB. Click File > Open video file, and select the movie.avi in the mplayer folder.


VirtualDUB


Now we add in the audio. Click Audio > WAV Audio, and select the CONVERT.AT3.wav. Now you can listen to your PMF with sound. At the bottom, click either the second or third button from the left.


It's working!


Now all that remains is to save this as an AVI file. But first we have to add compression for the video, else the output is going to be in the gigabytes.

Click Video > Compression, and you're presented with a myraid of different video compression options. I chose DivX, though you're free to choose any other compression formats you want.


I chose DivX compression


Click Configure and set the Bitrate at the bottom to 1500kbps, since that's what we encoded the video source at. There is no point setting it higher than 1500kbps here. If you wanted a higher bitrate, it should have been done when you were ripping the video from the PMF file.


Setting the bitrate of the output video


Once that's done, click File > Save as AVI to save your file. VirtualDUB will begin to encode your video. Untick the checkboxes for "Show input video" and "Show output video", they're quite pointless. VirtualDUB will show you a projected file size for your final file, so you'll have a rough idea of how big the video is going to be.


Saving the output video

And that's it! You've successfully converted a PMF file to an AVI file with sound.

Here is a video that I encoded previously:
Angeal vs Genesis vs Sephiroth - from Crisis Core
Encoded in DivX, "perfect" sound (ripped from PMF)
1484kbps/705kbps

Tuesday, October 30, 2007

PSP Troubleshooting

Here's my final post: How to tell when you need Pandora to fix your PSP/PSP Slim, and when you can fix it yourself.

Step 1
Can you switch on your PSP and go to the XMB? This is what the XMB looks like: Link

Yes: Proceed to Step 2
No: Proceed to Step 3

Step 2
Check the firmware of your PSP/PSP Slim. Go all the way left to the Settings Icon, and scroll down to the System Settings Icon. Press X or O (depending on your settings) and scroll down to System Information.

If your firmware is in this format: Version X.XX
- You have official firmware. You will need Pandora if you want to install custom firmware on your PSP/PSP Slim.
If your firmware is in this format: Version X.XX M33-X / X.XX OE-X / X.XX SE-X
- You already have custom firmware. No need to do anything else.

Step 3
Try holding R-trigger and switching on your PSP.

If you see the recovery menu: Go to Step 4
If you still see a black screen: Go to Step 5

Step 4
Old PSP or PSP Slim?

PSP Slim:
You will need someone with Pandora to fix your PSP.

Old PSP:
Through the recovery menu, we can easily reinstall custom firmware. There is no need for Pandora.

Download this file to downgrade back to 1.50: FILE 1
You will also need Sony's official 1.50 firmware update file: FILE 2
Enter the recovery menu, and use Toggle USB (first option) to connect your PSP to your PC.
Open FILE 1 and double click on the UPDATE folder.
Copy the five files to X:/PSP/GAME/RECOVERY
Extract the EBOOT.PBP out from FILE 2 and rename it to "150.PBP". Copy this to X:/PSP/GAME/RECOVERY
When you've finished copying, press Toggle USB again to close the connection.
Now select the third option "Run program at /PSP/GAME/RECOVERY/EBOOT.PBP" to downgrade to 1.50.

Once done, you can update to 3.71 M33-2.
Download the 3.71 M33 update: FILE 3
You will require Sony's official 3.71 firmware EBOOT.PBP, which can be found here (PSP-Hacks): FILE 4
Open FILE 3 and double click on the UPDATE folder.
Copy the two files to /PSP/GAME/UPDATE
Extract the EBOOT.PBP out from FILE 4 and rename it to "371.PBP". Copy this to X:/PSP/GAME/UPDATE
Run the update from the GAME menu.

Once the update is done, you can update to 3.71 M33-2 using this file: Link
Also install the 1.50 addon v2 if you are using the old PSP: Link
Instructions for usage of the two files can be found in the README.TXT.

Step 5
You will need someone with Pandora to help you fix this.

Fin

Sunday, October 14, 2007

Making ISOs Smaller: Part Three

I've finally gotten down to finishing up the third part of Making ISOs Smaller. In the first part, I covered simple compression of ISO files, while in the second part I covered ripping of files out from the ISO. Today, I'll be covering the last technique I know, which is the ripping of files from munge files.

What are munge files? Firstly, MUNGE is actually an acronym, and it stands for Modify Until Not Guessed Easily. Similarly, a munge file is a file that has been modified until we are unable to tell the contents of it without using a dedicated application. In the context of ISOs, some games have all their data stored into one huge munge file, instead of separating them. Here's a screenshot of the difference between two games, one with a munge file and one without.


Crisis Core has a munge file


COD doesn't have a munge file

As you can see, Crisis Core contains a munge file that's nearly 1.7GB, while Call of Duty has its files individually stored into folders. This makes Call of Duty easily ripped, as you can simply go into the movie folder and relink all the movie files, instantly reducing the ISO size. On the other hand, you can't do the same with Crisis Core.

So, how do we go about ripping this munge file? We need the help of another program, Xpert 2, as well as the corresponding plugin for Crisis Core. Both will be available for download at the bottom of this post.

First, we will need to extract the munge files. Open up the ISO of Crisis Core, and extract both discimg.fse (LBA table) and discimg.pkg (munge file). This might take a while, as the files are nearly 1.7GB in size.

Once the extraction is done, close UMDGEN. We'll be moving on to Xpert 2. Run the setup program and install Xpert 2 first. Once it's done, we need to copy in the Crisis Core plugin. Go to where you installed Xpert 2, and copy the Crisis Core plugin to the Xpert-Plugins folder.


Place plugins inside Xpert-Plugins

Now run Xpert 2. It should take a while to load up the window, as well as the plugins.


First, select the Crisis Core plugin from the dropdown list labeled Xpert-Plugins. The Crisis Core picture should appear, indicating that you've selected the correct plugin. The window title should also change to reflect the plugin that's selected.


Notice the Crisis Core picture

Notice the row of buttons on top? Click the one with a yellow folder and the letter "B" on it. It's the button that's second from the right. Select the munge file, discimg.pkg.


Selecting the munge file

Now click on the button with a yellow folder and the letter "T". This is the button all the way to the right. Select the table file, discimg.fse.


Selecting the table file

Now that you've selected both files, the other buttons are now enabled. Click button 1: Extract LBA. Once it's done, a message box will pop up, informing you that the extraction of LBA is done. Click OK to continue.


After Step 1

Now, click button 2: Extract File. This will take as long as 15 minutes, as the individual files are being extracted out from the munge file. As usual, a message box will inform you once it's done.


After Step 2

Go back to the folder where you saved the discimg.pkg and discimg.fse files. You should now see a new folder, @DISCIMG.PKG. This contains the files that were stored inside the discimg.pkg munge file.


The contents of discimg.pkg

Here is where you can edit the files to cut down on the size. Some methods you can use are to replace the bigger files with smaller ones of the same type, or replacing the bigger files with empty files. This will involve quite a lot of manual work, so be prepared to spend a lot of time if you want to rip a complicated game.

Once you're done with the editing, it's back to Xpert 2 to rebuild the file. Click button 3: Rebuild File. Xpert will get to work combining all the individual files back into the munge file, and pop up a message box once it's done.


After Step 3

Lastly, click button 4: Rebuild LBA. This will fix up discimg.fse so that it will report the correct locations for the files.


After Step 4

Go back to the folder and look for the newly built files. They should be called NEW-DISCIMG.FSE and NEW-DISCIMG.PKG. Change their names back to discimg.fse and discimg.pkg respectively, and put them into the Crisis Core ISO file using UMDGEN. Save it and you're done.

This method can be used for any other munge files that you come across, as long as you have the correct plugin for the file that you're trying to edit. Have fun ripping games that you originally thought could never fit on your 1GB memory stick!

Note: The Xpert 2 RAR that you download here will have two files inside, Xpert.msi and Xpert.exe. First run Xpert.msi to install the program, then replace the original Xpert.exe with the one provided inside the RAR. This is a bugfix for the application, if you don't use it you might face some problems while using Xpert.

22/03/08: Now that the English version of Crisis Core has been released, seems like there's renewed interest about ripping it. I've reuploaded Xpert as well as the plugin here.
Get the Xpert 2 tool: Download
Xpert2 Fix: Download
And the Crisis Core Xpert Plugin: Download

Sunday, October 7, 2007

Making ISOs Smaller: Part Two

Welcome to the second part of my series on Making ISOs Smaller. As promised, this post will be covering the method of ripping your ISOs to squeeze them onto your memory stick.

Firstly, we'll need a copy of UMDGEN to be able to do this. UMDGEN is designed for use with PSP ISO images, and it comes with important functions like dummying, relinking, and saving straight to compressed format.


I'll be using Syphon Filter: Logan's Shadow as an example here. Logan's Shadow comes with quite a number of files that can be dummied or relinked to reduce the ISO size. Firstly, rip your UMD to get the ISO image. Some programs that you can use are PSP Filer and USBSSS.

Next, let's open up the ISO image in UMDGEN. Drag and drop the ISO file into UMDGEN and it should load automatically.


You should be able to see the icon of the game in the top right, as well as the size of the ISO at the bottom right corner. The folder structure will be displayed on the left side, while the files are displayed on the right side.

The first thing you can rip out of the game is the firmware update. You can remove it without any problems whatsoever. UMDGEN has made an easy Optimize button to do it for you, as well as remove excess padding between files and resizing dummy data. The Optimize button is found under the UMD Properties, at the bottom left.


Over here, you can also view other information like the Game ID, minimum firmware required to launch the game, and the version of the firmware update that comes with the game.

Click Optimize, and UMDGEN will get to work, giving you a final report on how much data was removed. I've already done it beforehand, so mine appears as 0.00 bytes, but usually you should see a reduction of about 40MB in size.


Once done, we'll now go back to the main part: ripping out individual files in the image. Go back to the Explorer tab. I'll do a runthrough of the entire folder structure.


First up, we have PSP_GAME. This contains the SYSDIR and USRDIR folders, as well as some PNG, PMF and AT3 files. These files are used to display the game icon, background image, and background music when you select the game on your PSP.


Here we have the SYSDIR folder. The contents of this folder is always the same for all PSP games. We have an UPDATE folder, which is where the firmware update is stored, and 2 files, EBOOT.BIN and BOOT.BIN, which are used to load the game. EBOOT.BIN is always needed, but you can actually safely dummy BOOT.BIN to save a little space.

To dummy a file, simply right-click on it, and select Dummy. The file name, size, LBA and last modified will now be displayed in red to indicate that it's being dummied.


Notice that there's no change in the image size. That's because the file is not being deleted, rather it is being replaced with empty data. This empty data will be easily reduced when you save this image with CSO compression.

Now we go into the main folder USRDIR, where all the game files are stored.


You should be able to see many PMF files that are pretty big, with sizes ranging from around 5MB to 50MB. These are video files, and are most probably in-game cutscenes. If you don't watch them, you can remove them and save quite a lot of space here.

For PMF files, I recommend that you do relinking instead. The reason is because most games have problems when asked to load a dummy PMF containing 0 data. Instead of dummying it straight, we can relink the larger PMF files to a smaller PMF file, allowing us to save space and also allow the game to run as per normal.

I've chosen BONUS_TER.PMF as my source file for the relinking. It's the smallest at around 5MB only, so it should cut down quite a bit of the file size once I'm done. If you really want to save even more space, you can actually relink all the PMF files to the ICON1.PMF in the PSP_GAME folder. That file is only 300KB in size, so that's potentially an additional 4.7MB saved per PMF file relinked.

To relink, first right-click on the source file (BONUS_TER.PMF) and select "Use Selected File as Source". You can also press the shortcut key CTRL-M.


Now, select all the PMF files you want to relink to BONUS_TER.PMF. To select multiple files, hold down CTRL, and click on each individual file that you want to select. You can also select files that are together by clicking and dragging to higlight one chunk of files at once.


Right click on any of the highlighted files, and select "Relink to \PSP_GAME\USRDIR\BONUS_TER.PMF".


Once it's done, you should notice that the relinked files have turned blue and their arrangement has shifted. The LBA of all the PMF files now reflect that of BONUS_TER.PMF, meaning that when the PSP looks for any of those video files in blue, it will go straight to the location of BONUS_TER.PMF, and play that instead. Relinking will also change the image size, which has now dropped by around 500MB to 689.50MB.


There are two more things that I know can be ripped: The demo of Syphon Filter: Combat Ops, and the Multiplayer function. The demo is found in the COMBAT_OPS folder, while the multiplayer is found in LS_PVP.


You can just dummy these two folders, but the respective features won't work anymore in the game. Together they take up approximately 98MB of space. I've dummied them in this example.

Anyway, once you're done, you're ready to save the ISO image. Click on the Save button in the toolbar, and select "Compressed (*.cso)" to save and compress the file directly.


Select the compression level (9 is for maximum compression), and click Continue.


UMDGEN will start to build the ISO first, and when it's done it'll automatically compress it to CSO format.


That's it! Let's check how much space we've saved by ripping files from the game.


By simply compressing the ISO to CSO, we got a file size of 1GB, or a reduction of 13%. But by ripping out various files, we've ended up with a compact file size of 544MB, or a reduction of 52%! So if you're the kind that ends up skipping all the cutscenes in games, why not rip them out and save that extra space for more games?

Start ripping with UMDGEN: Download

Saturday, October 6, 2007

PSP's Directory Structure Explained

Are you a new user of custom firmware? Baffled by the many different folders available on your memory stick? Fret not, I've put together a short and simple guide to explain to you the folders and their uses.

if you don't have the default set of folders on your memory stick, simply format your memory stick using your PSP. Go to Settings > System Settings > Format Memory Stick. ALL DATA WILL BE LOST, so remember to make a backup before formatting. You can still continue reading this guide without formatting your memory stick, just take note of the folders you want and create them manually on your memory stick.

Connect your PSP to your computer now, or insert your memory stick into your card reader. If you've formatted your memory stick via the PSP, the default folders should have been created, and it should look something like this:


ISO: Your PSP games go into this folder. Acceptable formats are ISO and CSO. Simply put the whole file inside this folder, and the game will be available from the GAME menu on the PSP.

MP_ROOT: Your MP4 videos have to be placed into this folder. Only then will you be able to play them from the VIDEO menu on the PSP. It's subdivided into two folders inside, but more on this later.

MUSIC: All music files should be put here if you want to play them via the MUSIC menu on the PSP. You can organise your music files in folders as well, but only one level of folders is allowed. The PSP can only play MP3, MP4, ATRAC3, ATRAC3plus, WAV and WMA formats only, so check before you place music onto your PSP.


Acceptable sub-folders: 1 level only


2 levels of sub-folders is not allowed

PICTURE: You can place picture files here for viewing in the PHOTO menu on the PSP. The PSP can only read JPEG, TIFF, PNG, GIF and BMP formats, so make sure you have converted your pictures to these formats before you attempt to view them. This folder supports up to one level of sub-folders, just like the MUSIC folder.

PSP: This folder contains homebrew, saved games and browser data. It'll be covered in more detail below.

seplugins: Plugins for custom firmware go inside this folder. I've already covered installing plugins in a previous post, so refer there to learn more.

VIDEO: This folder is supposed to be able to play videos, but if you've converted your videos to MP4 format using software like PSP Video 9 or 3GPConverter, they won't work in this folder. I advise you leave this folder alone and just use the folders in MP_ROOT.

MEMSTICK.IND & MSTK_PRO.IND: These files are created when you format your memory stick with the PSP. You can either leave them there, or delete them. As far as I know, they don't affect the operation of the memory stick with the PSP.

Now let's get back to the MP_ROOT folder:


Inside the MP_ROOT folder, you'll see two other folders, 100MNV01 and 101ANV01. Regular MP4 videos go into the 100MNV01 folder, while AVC-encoded videos go into 101ANV01. If you're not sure which format your MP4 is encoded in, just try putting them into 100MNV01. More often than not it should work, else just simply move them over to the 101ANV01 folder. Videos have to be named like this: M4Vxxxxx.MP4 for regular MP4 videos and MAQxxxxx.MP4 for AVC-encoded videos, where xxxxx is any 5-digit number.

You can sub-divide your videos into different folders as well. Simply create new folders in this format: xxxMNV01 for regular MP4 videos and xxxANV01 for AVC-encoded videos, with xxx as any 3-digit number.

Lastly, the PSP folder. This contains the most sub-folders as compared to the others:


GAME, GAME150 and GAME3xx: These folders are reserved for homebrew and PSX games. Homebrew in GAME will be executed using the kernel set in the recovery menu, while homebrew in GAME150 and GAME3xx will be executed using 1.50 kernel and 3.xx kernel respectively.

COMMON: You can use this folder to store portal pages for your PSP. Portal pages are just HTML pages that have been put together for viewing on the PSP.

PHOTO: This folder can store picture files as well. You can choose to put your pictures in either this folder or the PICTURE folder. Like the MUSIC and PICTURE folder, the PHOTO folder also accepts one level of sub-folders.

SAVEDATA: As the name implies, this folder stores all your saved data for PSP and PSX games. Each save data is stored in its own folder, with the game ID as the folder name.

SYSTEM: In here, you will find a file ISOCACHE.BIN and another folder, BROWSER. ISOCACHE.BIN stores the names of the ISOs available on your memory stick, allowing them to be displayed faster in the GAME menu. In the BROWSER folder, you will find files that store your browser history, as well as bookmarks.

These are the basic folders, but there are actually more folders that can be accessed on the PSP. I won't be covering them here, instead I'll just give a brief overview.

PSP/SYSTEM/RSSCH: You can find RSS channels that you have subscribed to here. The folder will be created automatically once you subscribe to your first RSS Channel.

PSP/MUSIC: This folder works the same as the MUSIC folder in the root of your memory stick, but it's been removed from the default folders.

DCIM/101MSDCF: This will create a "Digital Camera Images" under the PHOTO menu on your PSP. You can copy images from your digital camera straight to this folder and be able to view it on the PSP. The images have to follow this strict naming format: DSCxxxxx.JPG, where xxxxx can be any 5-digit number.

Now that you know how to use the different folders, try playing around with them and maximize the full potential of the PSP!


Twitter and Facebook SMS Updates