I've finally gotten down to finishing up the third part of Making ISOs Smaller. In the first part, I covered simple compression of ISO files, while in the second part I covered ripping of files out from the ISO. Today, I'll be covering the last technique I know, which is the ripping of files from munge files.
What are munge files? Firstly, MUNGE is actually an acronym, and it stands for Modify Until Not Guessed Easily. Similarly, a munge file is a file that has been modified until we are unable to tell the contents of it without using a dedicated application. In the context of ISOs, some games have all their data stored into one huge munge file, instead of separating them. Here's a screenshot of the difference between two games, one with a munge file and one without.
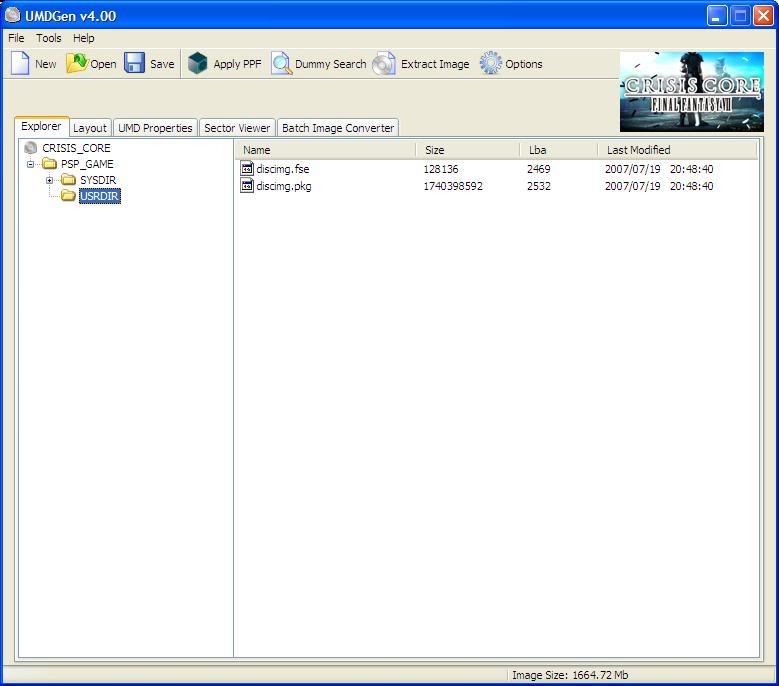
Crisis Core has a munge file
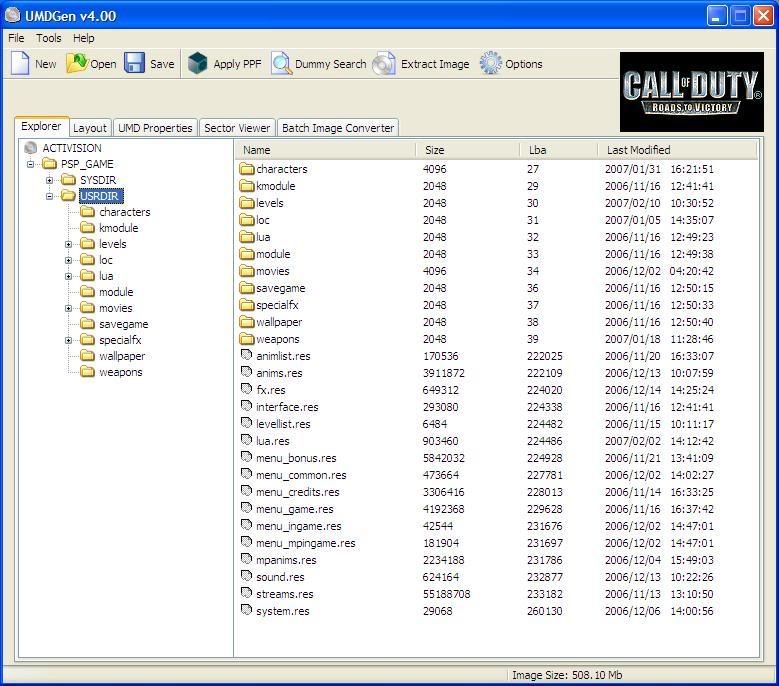
COD doesn't have a munge file
As you can see, Crisis Core contains a munge file that's nearly 1.7GB, while Call of Duty has its files individually stored into folders. This makes Call of Duty easily ripped, as you can simply go into the movie folder and relink all the movie files, instantly reducing the ISO size. On the other hand, you can't do the same with Crisis Core.
So, how do we go about ripping this munge file? We need the help of another program, Xpert 2, as well as the corresponding plugin for Crisis Core. Both will be available for download at the bottom of this post.
First, we will need to extract the munge files. Open up the ISO of Crisis Core, and extract both discimg.fse (LBA table) and discimg.pkg (munge file). This might take a while, as the files are nearly 1.7GB in size.
Once the extraction is done, close UMDGEN. We'll be moving on to Xpert 2. Run the setup program and install Xpert 2 first. Once it's done, we need to copy in the Crisis Core plugin. Go to where you installed Xpert 2, and copy the Crisis Core plugin to the Xpert-Plugins folder.
Place plugins inside Xpert-Plugins
Now run Xpert 2. It should take a while to load up the window, as well as the plugins.
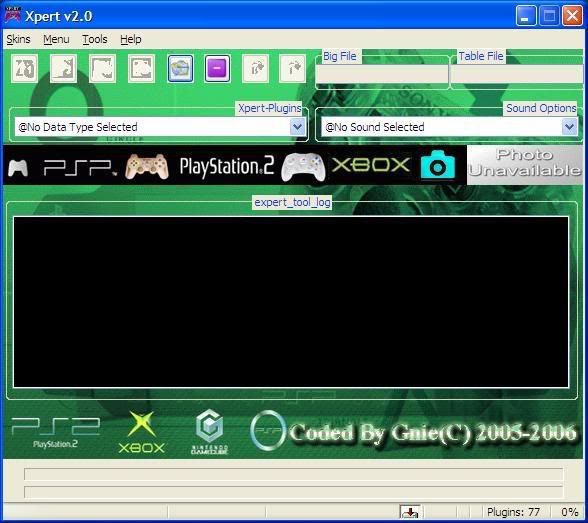
First, select the Crisis Core plugin from the dropdown list labeled Xpert-Plugins. The Crisis Core picture should appear, indicating that you've selected the correct plugin. The window title should also change to reflect the plugin that's selected.
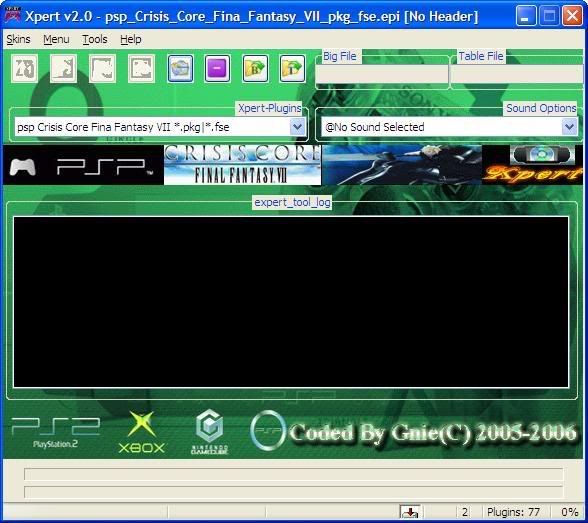
Notice the Crisis Core picture
Notice the row of buttons on top? Click the one with a yellow folder and the letter "B" on it. It's the button that's second from the right. Select the munge file, discimg.pkg.
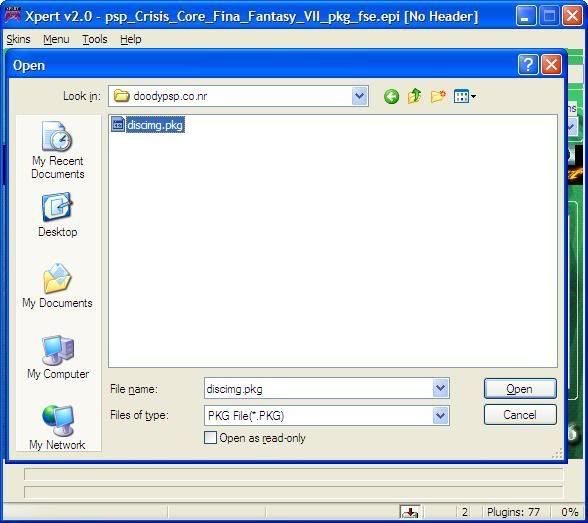
Selecting the munge file
Now click on the button with a yellow folder and the letter "T". This is the button all the way to the right. Select the table file, discimg.fse.
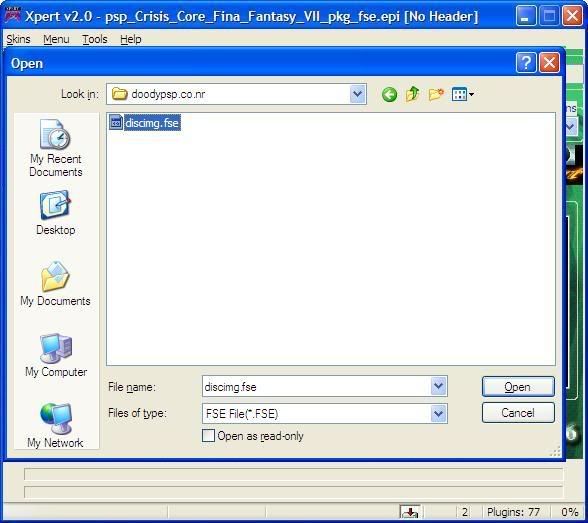
Selecting the table file
Now that you've selected both files, the other buttons are now enabled. Click button 1: Extract LBA. Once it's done, a message box will pop up, informing you that the extraction of LBA is done. Click OK to continue.
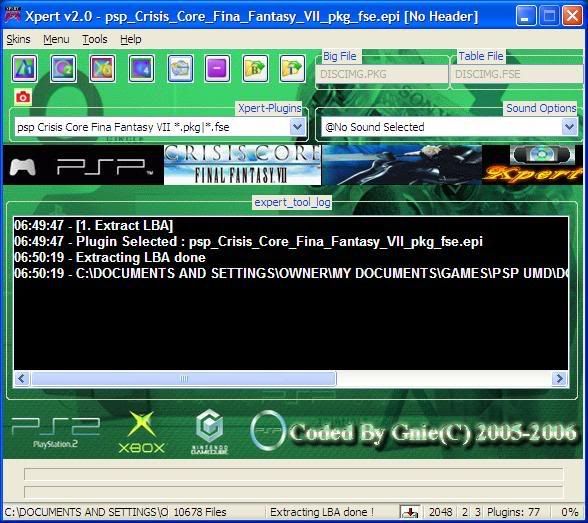
After Step 1
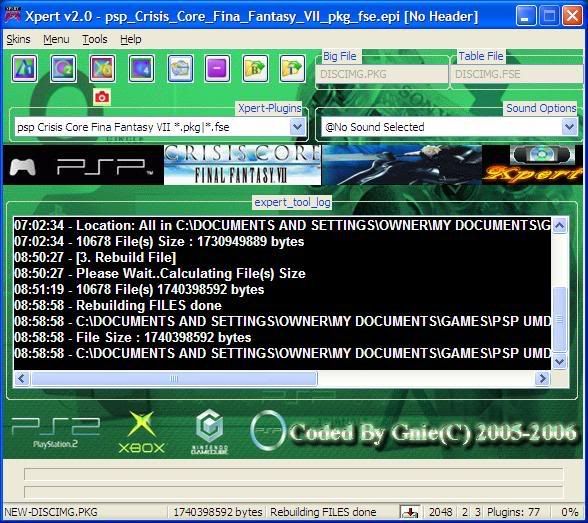
Now, click button 2: Extract File. This will take as long as 15 minutes, as the individual files are being extracted out from the munge file. As usual, a message box will inform you once it's done.

After Step 2
Go back to the folder where you saved the discimg.pkg and discimg.fse files. You should now see a new folder, @DISCIMG.PKG. This contains the files that were stored inside the discimg.pkg munge file.
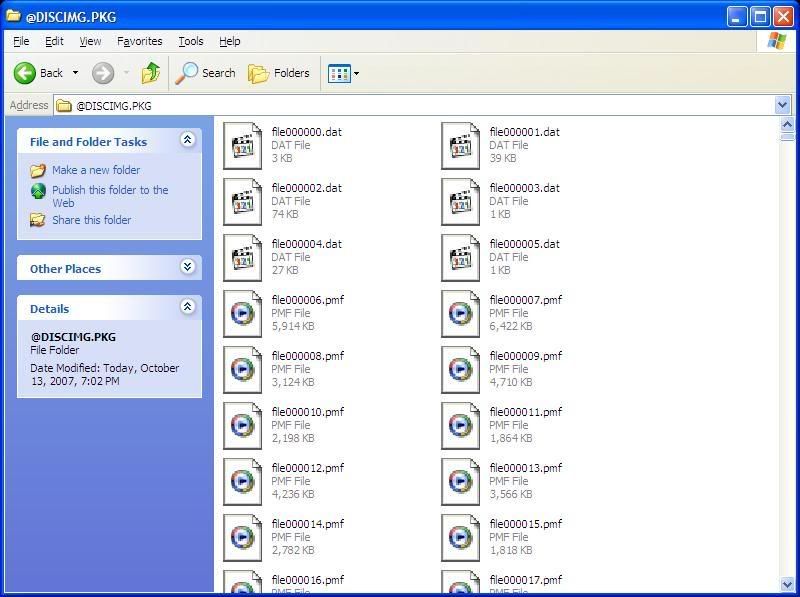
The contents of discimg.pkg
Here is where you can edit the files to cut down on the size. Some methods you can use are to replace the bigger files with smaller ones of the same type, or replacing the bigger files with empty files. This will involve quite a lot of manual work, so be prepared to spend a lot of time if you want to rip a complicated game.
Once you're done with the editing, it's back to Xpert 2 to rebuild the file. Click button 3: Rebuild File. Xpert will get to work combining all the individual files back into the munge file, and pop up a message box once it's done.
After Step 3
Lastly, click button 4: Rebuild LBA. This will fix up discimg.fse so that it will report the correct locations for the files.
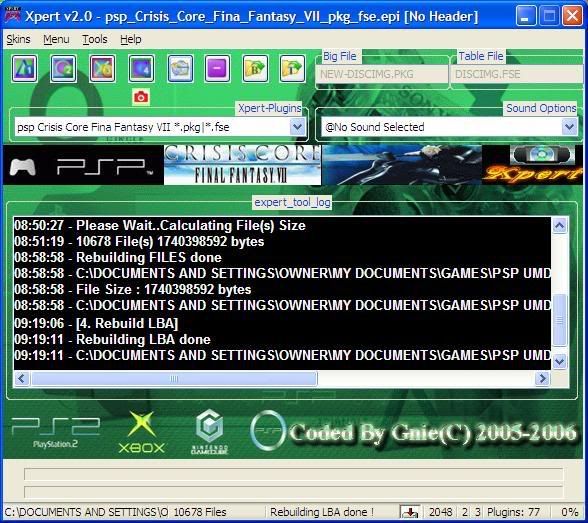
After Step 4
Go back to the folder and look for the newly built files. They should be called NEW-DISCIMG.FSE and NEW-DISCIMG.PKG. Change their names back to discimg.fse and discimg.pkg respectively, and put them into the Crisis Core ISO file using UMDGEN. Save it and you're done.
This method can be used for any other munge files that you come across, as long as you have the correct plugin for the file that you're trying to edit. Have fun ripping games that you originally thought could never fit on your 1GB memory stick!
Note: The Xpert 2 RAR that you download here will have two files inside, Xpert.msi and Xpert.exe. First run Xpert.msi to install the program, then replace the original Xpert.exe with the one provided inside the RAR. This is a bugfix for the application, if you don't use it you might face some problems while using Xpert.
22/03/08: Now that the English version of Crisis Core has been released, seems like there's renewed interest about ripping it. I've reuploaded Xpert as well as the plugin here.
Get the Xpert 2 tool: Download
Xpert2 Fix: Download
And the Crisis Core Xpert Plugin: Download
What are munge files? Firstly, MUNGE is actually an acronym, and it stands for Modify Until Not Guessed Easily. Similarly, a munge file is a file that has been modified until we are unable to tell the contents of it without using a dedicated application. In the context of ISOs, some games have all their data stored into one huge munge file, instead of separating them. Here's a screenshot of the difference between two games, one with a munge file and one without.
Crisis Core has a munge file
COD doesn't have a munge file
As you can see, Crisis Core contains a munge file that's nearly 1.7GB, while Call of Duty has its files individually stored into folders. This makes Call of Duty easily ripped, as you can simply go into the movie folder and relink all the movie files, instantly reducing the ISO size. On the other hand, you can't do the same with Crisis Core.
So, how do we go about ripping this munge file? We need the help of another program, Xpert 2, as well as the corresponding plugin for Crisis Core. Both will be available for download at the bottom of this post.
First, we will need to extract the munge files. Open up the ISO of Crisis Core, and extract both discimg.fse (LBA table) and discimg.pkg (munge file). This might take a while, as the files are nearly 1.7GB in size.
Once the extraction is done, close UMDGEN. We'll be moving on to Xpert 2. Run the setup program and install Xpert 2 first. Once it's done, we need to copy in the Crisis Core plugin. Go to where you installed Xpert 2, and copy the Crisis Core plugin to the Xpert-Plugins folder.
Place plugins inside Xpert-Plugins
Now run Xpert 2. It should take a while to load up the window, as well as the plugins.
First, select the Crisis Core plugin from the dropdown list labeled Xpert-Plugins. The Crisis Core picture should appear, indicating that you've selected the correct plugin. The window title should also change to reflect the plugin that's selected.
Notice the Crisis Core picture
Notice the row of buttons on top? Click the one with a yellow folder and the letter "B" on it. It's the button that's second from the right. Select the munge file, discimg.pkg.
Selecting the munge file
Now click on the button with a yellow folder and the letter "T". This is the button all the way to the right. Select the table file, discimg.fse.
Selecting the table file
Now that you've selected both files, the other buttons are now enabled. Click button 1: Extract LBA. Once it's done, a message box will pop up, informing you that the extraction of LBA is done. Click OK to continue.
After Step 1
Now, click button 2: Extract File. This will take as long as 15 minutes, as the individual files are being extracted out from the munge file. As usual, a message box will inform you once it's done.
After Step 2
Go back to the folder where you saved the discimg.pkg and discimg.fse files. You should now see a new folder, @DISCIMG.PKG. This contains the files that were stored inside the discimg.pkg munge file.
The contents of discimg.pkg
Here is where you can edit the files to cut down on the size. Some methods you can use are to replace the bigger files with smaller ones of the same type, or replacing the bigger files with empty files. This will involve quite a lot of manual work, so be prepared to spend a lot of time if you want to rip a complicated game.
Once you're done with the editing, it's back to Xpert 2 to rebuild the file. Click button 3: Rebuild File. Xpert will get to work combining all the individual files back into the munge file, and pop up a message box once it's done.
After Step 3
Lastly, click button 4: Rebuild LBA. This will fix up discimg.fse so that it will report the correct locations for the files.
After Step 4
Go back to the folder and look for the newly built files. They should be called NEW-DISCIMG.FSE and NEW-DISCIMG.PKG. Change their names back to discimg.fse and discimg.pkg respectively, and put them into the Crisis Core ISO file using UMDGEN. Save it and you're done.
This method can be used for any other munge files that you come across, as long as you have the correct plugin for the file that you're trying to edit. Have fun ripping games that you originally thought could never fit on your 1GB memory stick!
Note: The Xpert 2 RAR that you download here will have two files inside, Xpert.msi and Xpert.exe. First run Xpert.msi to install the program, then replace the original Xpert.exe with the one provided inside the RAR. This is a bugfix for the application, if you don't use it you might face some problems while using Xpert.
22/03/08: Now that the English version of Crisis Core has been released, seems like there's renewed interest about ripping it. I've reuploaded Xpert as well as the plugin here.
Get the Xpert 2 tool: Download
Xpert2 Fix: Download
And the Crisis Core Xpert Plugin: Download

17 comments:
unable to download xpert2.. think ur media fire's expired or something...
The Links you provide for Xpert Tool v2.0 and the fixed exe is invalid on mediafire.
Thanks for the tute tho, nice and easy to follow.
sorry..upload a xpert2
So sorry about the broken links. Mediafire terminated my account a long time ago. I'm uploading the files again, so check back in a while. You can also google for Xpert - you should be able to find it.
Ow thanks man, awesome. I would guess , that way you can either do a undub, or rip?
I've already posted the instructions in my post. Follow them to make your own rip of Crisis Core.
"Here is where you can edit the files to cut down on the size. Some methods you can use are to replace the bigger files with smaller ones of the same type, or replacing the bigger files with empty files. This will involve quite a lot of manual work, so be prepared to spend a lot of time if you want to rip a complicated game."
Any idea how this manual work would be done?
can this be used to extract a PS3.PKG file without a table file?
The manual work involves replacing the files that you don't want with dummy files that are 0 bytes in size.
What's a PS3.PKG file?
Anyway, you need the plugin if you want to extract the files. For example, to extract the PKG file of Crisis Core, you need the Crisis Core plugin.
Different files might be built differently, so this plugin might or might not work for other PKG files. You can give it a try, though.
hi umm when i extract the file i get an error. or is it my ff:cc file
It might be your PKG file. Try running the ISO without any modifications first.
Else, maybe you clicked some buttons wrongly :).
"Here is where you can edit the files to cut down on the size. Some methods you can use are to replace the bigger files with smaller ones of the same type, or replacing the bigger files with empty files. This will involve quite a lot of manual work, so be prepared to spend a lot of time if you want to rip a complicated game."
can you explain this part more? because i dont know what you mean by replacing bigger files with smaller ones, because there are so many files.
They should be called NEW-DISCIMG
It can't be use for extract .pkg files for psp go it says:wrong table!
Any help this?Thx.
Is there anyway to extract pspgo .pkg files,it say wrong table when i use ccore plugins :(
Is there anyway to extract pspgo .pkg files,it say wrong table when i use ccore plugins :(
Post a Comment